When you’re deep in an animation project, it can feel like every note or last-minute change threatens to derail your carefully built scene. Deadlines don’t pause, and reviewers expect fixes that look invisible and effortless. After Effects earns its place when you use it as a fast finishing and compositing hub that enhances renders, fixes small issues, and prepares clean deliveries without disrupting your animation workflow. This post maps where AE fits, what it does best, and how to practice in a way that reads studio-ready.
Where After Effects Sits in the Pipeline
Studios rely on predictable workflows, so it helps to know exactly where AE belongs. After Effects typically follows animation and precedes final delivery so you can composite passes, add motion graphics, and finalize shots for review or publication. Keeping layout, rigging, and heavy animation inside your primary DCC preserves performance while AE specializes in speed and polish.
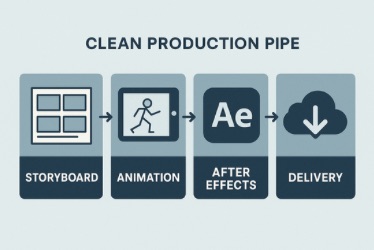
The workflow becomes much clearer when each stage has a defined purpose. A production path that moves from storyboard to animation app (Toon Boom, Maya, Blender), then through After Effects, and finally to delivery ensures that every tool contributes where it is strongest. AE handles finishing, and your animation scenes remain stable and lightweight.
What After Effects Does Best
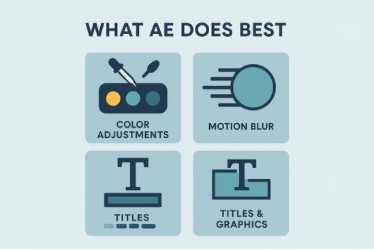
Every tool has a sweet spot, and AE’s is all about presentation. AE works best as a compositor and finisher that improves readability and production value without requiring a full re-render. Typical gains include color adjustments, glows, light wraps, motion blur, tracked graphics, and title timing that supports story beats.
A director may request stronger impact on a logo reveal with smoother motion and more presence. You can lift exposure slightly, add a restrained glow, apply Pixel Motion Blur, and refine title easing in the Graph Editor, which produces a sharper read in minutes and avoids reopening the 3D scene. These fast adjustments highlight how AE provides flexibility at the finishing stage and makes late creative notes far less disruptive.
Inside the Tool at a Glance
Clarity comes from structure, and AE is no exception. Layers, keyframes, precomps, and a tidy timeline form the foundation of fast work in After Effects. Confidence with easing and the Graph Editor, thoughtful parenting, and clean comp structure keeps reviewers unblocked and makes collaboration smoother.
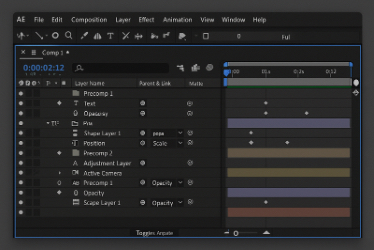
A team might need a headline animation retimed across ten shots with identical behavior. You can place the headline and its accents in a single precomp, parent the accents to the headline, and adjust the timing once in the master comp so all ten shots update consistently without duplicate keyframe edits. This kind of efficiency proves how AE’s structure supports collaboration and prevents small changes from becoming major time drains.
Export and Delivery Without Drama
Finishing only matters if the final file is reliable. Standardized export presets for review files and masters make AE handoffs predictable across clients, social platforms, and internal dailies. Consistent frame rates, codecs, and color management prevent avoidable notes and shorten approval loops.

Daily reviews often require a small file quickly and a high-quality master later. You can export a 1080p H.264 review from a saved preset for immediate sharing and queue a ProRes master in Adobe Media Encoder so the archival upload completes in the background while you continue working. By creating a reliable export routine, you ensure every delivery feels consistent and avoids unnecessary back-and-forth over technical issues.
Pros and Cons at a Glance
Before you rely on AE for every project, it helps to weigh strengths against limitations. Choose AE when the finishing gains outweigh the cost of leaving your primary animation tool. The points below offer practical guidance for day-to-day decisions.
- Pros: Fast compositing and polish; flexible motion graphics; broad plug-in ecosystem; quick client-ready exports; helpful for late note changes.
- Cons: Not a rigging or character-animation replacement; heavy effects can slow machines; cross-app version control needs discipline; 3D is limited compared to dedicated DCCs.
When you weigh these points, the path becomes clear. You should animate where animation belongs, and then finish in AE to raise clarity and presentation while safeguarding core scenes.
Skills Roadmap: Level Up for Production
Improving your AE skills is less about tricks and more about steady fundamentals. Pair animation fundamentals with targeted AE skills so your shots move from DCC to finish smoothly. Use the checklist to focus practice that reviewers recognize.
- Timeline Fluency: Clean layer naming, parenting, precomps, easy-ease timing, Graph Editor basics.
- Compositing: Light wraps, glows, blur types, track mattes, blending modes, luma/alpha keys.
- Graphics: Lower thirds, captions, callouts, brand-safe typography, safe areas.
- Color: Adjustment layers, basic grading, LUTs, scopes for exposure and balance.
- Handoff: Import image sequences, preserve frame rate and color space, export review and master presets via Media Encoder.
- Quality Bar: Check flicker, banding, crushed blacks, aliasing, edge chatter, and title safety.
To seal the lesson, close each portfolio piece with a short note that lists your AE passes and the problem each one solved. This helps reviewers see how finishing choices improved clarity and intent, while proving that your workflow translates smoothly to production settings.
Final Thoughts
Projects move faster and read more clearly when finishing is reliable. After Effects provides the most value when it finishes and communicates your animation clearly while respecting the role of your primary DCC. Framed as a fast, reliable final step, your work reads as polished, portable, and production-aware.
Source Material
- Adobe After Effects overview: adobe.com/products/aftereffects.html
- Adobe Media Encoder: adobe.com/products/media-encoder.html
- Toon Boom Harmony: toonboom.com/products/harmony
- Autodesk Maya overview: autodesk.com/products/maya/overview
- Blender: blender.org


