
Why Start with the Bouncing Ball?
The bouncing ball is animation’s version of the alphabet. It may seem simple, but it teaches timing, spacing, squash and stretch, and arc—all of which are essential to animation. By learning this one motion, you’re building the foundation for everything else you’ll animate later. Think of it as your first step toward giving drawings life.
Step 1: Understand the Motion
Before you draw a single frame, picture how a real ball moves. When you drop it, it speeds up as it falls, hits the ground, squashes, and bounces back up—slowing as it climbs. This motion follows the laws of physics, but it also gives you a chance to exaggerate and stylize that motion.
- Faster spacing as the ball falls (acceleration)
- Squash on impact to show weight
- Stretch as it bounces upward (if stylized)
- Smaller bounces over time (losing energy)
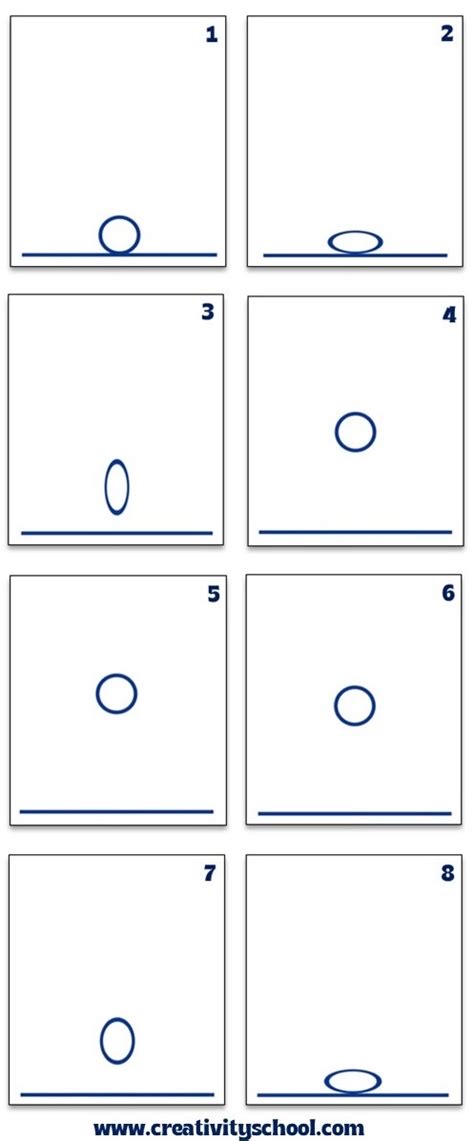
This is what gives the ball its believability—and personality.
Step 2: Plan Your Key Poses
Start with these four basic poses: the top of the bounce, the squash on contact, the stretch when rebounding, and the next peak. These form the structure of your animation and keep it clear and consistent.
You can sketch these poses first or block them digitally. These form the “skeleton” of your animation, giving structure and clarity to your movement.
Step 3: Add Timing and Spacing
Spacing is where the real magic happens. Closer frames = slower motion; wider spacing = faster motion. Here’s how you can apply it:
- Tight spacing at the top of each bounce (slowing)
- Wider spacing during the fall (speeding up)
- More frames near the squash point (to hold the impact)
Even without color or detail, good spacing makes your animation feel alive.
Step 4: Polish with Arcs and Follow-Through
Balls don’t fall in straight lines. They follow curved arcs. Make sure your frames show a soft, believable path of motion. You can lightly draw a motion arc as a guide. This is especially helpful if your ball is traveling forward instead of just bouncing up and down.
Step 5: Test and Refine
Whether you’re working with paper, a flipbook app, or a digital timeline, always play back your animation. Watch for these signs:
- Does the ball feel too floaty? Add gravity with spacing.
- Does it stop too suddenly? Try adding smaller bounces at the end.
- Does the squash feel abrupt? Add one more in-between frame.
Even basic animation can benefit from testing and tweaking. This is where your instincts begin to form.

Final Thoughts
Mastering the bouncing ball may seem like a small win, but it’s one of the most valuable lessons in animation. It teaches physics, rhythm, and personality—all from a simple circle. Keep practicing, and don’t be afraid to exaggerate. What you learn here will pay off every time your character jumps, lands, or even blinks.
Source Material
- Squash & Stretch: Bouncing Ball Animation – Creativity School
- The Bouncing Ball Exercise – AnimationResources.org
- Ultimate Bouncing Ball Rig – Bloop Animation – (free squash-and-stretch rig for beginners)


